 |
ucglib_xmega_hal
4.0
Xmega Hardware Abstraction Layer for Ucglib
|
|
ucglib_xmega_hal
4.0
Xmega Hardware Abstraction Layer for Ucglib
|
This is the Xmega Hardware Abstraction Layer for the C implementation of the ucglib library from Oli Kraus
The C implementation of the ucglib library can be found at https://github.com/olikraus/ucglib/tree/master/csrc
This HAL contains four c- and h-files:
| ucglib_xmega_hal.c | Functions for the HAL |
| ucglib_xmega.h | Prototypes and definitions of the HAL |
| ucg_print.c | An addition to ucglib with printing facilities |
| ucg_bmp.c | An addition to ucglib with image facilities |
| ucg_font.c | A modified ucg_font.c |
| ucg.h | A modified header file for ucglib |
| main_test_hal.c | An example for a 1.8 inch TFT LCD Module |
| main_test_library.c | An example for a 1.8 inch TFT LCD Module using ucglib_xmega.a |
This HAL also contains a precompiled library for the ATxmega256a3u:
| libucglib_xmega.a | All precompiled functions of ucglib and all precompiled functions of the HAL |
You can use the precompiled library only for the ATxmega256a3u and a ST7735 display
The examples uses the 32 MHz clock. So you need clock.c and clock.h from http://dolman-wim.nl/xmega/libraries/index.php
These are the steps for using ucglib with a Xmega
*             Display           Xmega
*             VCC               3V3
*             GND               GND
*             CS                D4  (SS)
*             RESET             D3
*             A0   (DC or CD)   D2
*             SDA               D5  (MOSI)
*             SCK               D7  (SCK)
*             LED  (BLK)        D1
*                               D6  (MISO)  not connected
These are the steps for using the precompiled atxmega256a3u library
*             Display           Xmega
*             VCC               3V3
*             GND               GND
*             CS                D4  (SS)
*             RESET             D3
*             A0   (DC or CD)   D2
*             SDA               D5  (MOSI)
*             SCK               D7  (SCK)
*             LED  (BLK)        D1
*                               D6  (MISO)  not connected
These are the steps for building a precompiled static library
This HAL uses for the serial communication SPI or bit banging. With SPI the display must connected to one of the SPI's of the Xmega. With bit banging all connections are available
The test uses this 1.8 inch TFT LCD Module:

|
The configuration for using SPI of port D. Declare an array of pins for the non-SPI connections
*     pin_t connectArraySPI[] = {
*       { UCG_XMEGA_PIN_RST, &PORTD, PIN3_bp },   // RST
*       { UCG_XMEGA_PIN_CD,  &PORTD, PIN2_bp },   // CD
*       { UCG_XMEGA_PIN_BLK, &PORTD, PIN1_bp },   // BLK
*       { UCG_XMEGA_PIN_NULL }
*     };
Call the connect function before you call ucg_Init:
* ucg_connectXmega(&ucg, &SPID, connectArraySPI, 0);
With SPI you can use the HAL-function ucg_commXmegaSPI() or ucg_commXmega(). The function ucg_commXmegaSPI() uses macro's in stead of function calls and is about 20% faster.
The configuration for bit banging Declare an array all connections
*      pin_t connectArrayBBcompatibelSPID[] = {
*       { UCG_XMEGA_PIN_SCK, &PORTD, PIN7_bp },   // SCK
*       { UCG_XMEGA_PIN_SDA, &PORTD, PIN5_bp },   // SDA
*       { UCG_XMEGA_PIN_CS,  &PORTD, PIN4_bp },   // CS
*       { UCG_XMEGA_PIN_RST, &PORTD, PIN3_bp },   // RST
*       { UCG_XMEGA_PIN_CD,  &PORTD, PIN2_bp },   // CD
*       { UCG_XMEGA_PIN_NULL }
*     };
Call the connect function before you call ucg_Init:
* ucg_connectXmega(&ucg, NULL, connectArrayBBcompatibelSPID, 0);
SPI is roughly two times faster than the bit banging.
The BLK connection of the display can be connected to the Xmega or external to VCC. If the third parameter in the function ucg_connectXmega() is 1 the pin of the Xmega that is connected to BLK will be disabled. This makes it possible to make a tight connection between the Xmega an the display on a breadboard.
|
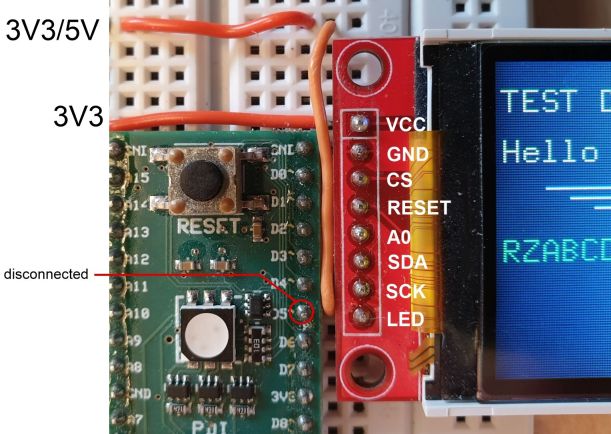
The connections are listed here:
*             Display           Xmega/power
*             VCC               3V3
*             GND               GND
*             CS                D0
*             RESET             D1
*             A0   (DC or CD)   D2
*             SDA               D3
*             SCK               D4
*             LED  (BLK)        D5 (Disabled), connect LED direct to 3V3 or 5V
The Print facilities ucg_Print(), ucg_GetPrintPos(), ucg_SetPrintPos() and ucg_SetPrintDir() that accompanies the Arduino implementation of Kraus libary are also available. Our ucg_Print() doesn't use the overloading characteristics of the Arduino Print-function, but uses formatted printing.
From version 2.1 a function ucg_BitmapPrint() is added. This function prints a bitmap to the display. The bitmap is an array with rgb-pixels. The size of the array may not exceed the 32K limit. Pictures larger than 32K must be split in smaller blocks. From version 4.0 much faster functions ucg_DrawBmp(), ucg_DrawBmpLine() and ucg_DrawBmpRotate() are added. The function ucg_BitmapPrint() is now obsolete.
Two examples can be found in the folder examples.
A non-AVR program to split a PNG file in multiple arrays can be found in the folder gcc.
In version 4.0 some modifications of the original ucg_lib are needed. The original version uses PROGMEM. This version uses for the bitmaps __memx. The combination of PROGMEM and __memx results in conflicts. A new ucg_font.c that uses __memx is added. In the added ucg.h you can still choose for PROGMEM by commenting the definition of USE_OF_MEMX. With USE_OF_MEMX you can use all memory, withou you are limited to less then 64K. With USE_OF_MEMX the application can less than 1% slower.
This library is free software. You can redistribute it and/or modify it. This program is distributed in the hope that it will be useful, but WITHOUT ANY WARRANTY.
 1.8.13